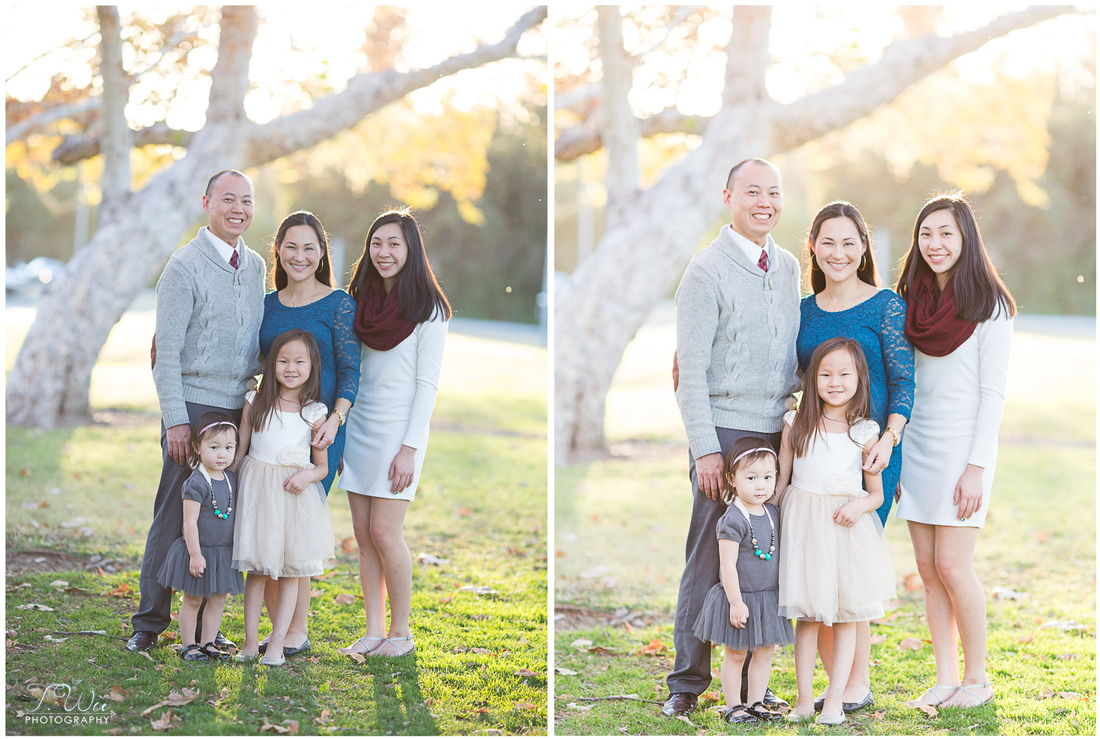
Here is a snapshot of the before and after of my family session with the Hsu family! Since this photo has gotten so many likes from photographers, I decided to write up a technical explanation of how I got the shot.
Summary
Time: This was shot about 1 hour before sunset (the golden hour!)
Gear: Canon Mark III + 135mm f/2
Settings: 1/800 f/2.5 ISO 1000
Edit: Lightroom
Time
When you shoot a family portrait session, the best time to plan the session is to end half an hour before sunset. Since the sun set at 5:30pm when this session was shot, we started at 3:30pm, which was perfect since it got really dark by 4:30pm. Golden hour lends the beautiful light that gives you shots like this! The light is the softest during this time, and gives you the perfect opportunity to backlight your subjects.
Note about backlighting: make sure it is being diffused by something-- in this instance, the light was shining in from the tree behind the family. It can be tricky to focus with backlighting, but some things that help are the lenses you use and a lens hood. In this case, I didn't have a lens hood, so I held my hand over the lens to block the light coming in from the sun. I also used back button focus* to help with focusing.
Gear
Since this was a session for my photography mentor Nadine of Sachiko Studio, she lent me her gear. While I love my Canon 6d, the Mark III was amazing! She also challenged me to use the 135mm f/2 to shoot her family due to the compression* that it offers. (Quick summary: longer lenses help a lot more with separating the subjects from the background) Normally I wouldn't shoot a family with such a long lens because you lose the kids' attention, but Nadine's kids were so good... good enough for me to get this shot at least ;)
Settings
1/800 f/2.5 ISO 1000
Some of you might think these settings are crazy for being outside in the sun, but Nadine has taught me to stick above 1/500 for shutter speed. The closer we are to 1/1000, the sharper our photos seem to be. I write this as a disclaimer since I know you could get sharp photos when you're under the 1/500 mark, but this just seems to work for us!
The amazing depth of field was thanks to the f/2.5 aperture. Since it was a group of 5 standing in two layers, I wanted to have some wiggle room, so I didn't shoot them at the widest aperture of 2.0. (Technically if they were standing on the same plane, I could have shot them at 2.0*) However, they were standing close enough where I could shoot them at 2.5, and still have everyone in focus.
I adjusted the ISO based on the light meter, and the Mark III could definitely handle an ISO of 1000 without any grain*!
Edit
Since I will most likely try to cover editing in another blog post, I'll keep this relatively short. I started with Katelyn James' Basic Import that she included when I bought her Skin Consistency Workshop. The gist of the import is lens correction and brightening the overall photo. I cropped it in to be straighter and closer to the family. I warmed it up with split toning and partially with the temperature slider. As Katelyn would say, I added some POP with the contrast and color sliders.
I hope this technical explanation helped anyone who was interested! Happy Monday everyone :)
-TWu
*There is so much that was covered in this post that will be covered in a future blog post!
 RSS Feed
